
These quilts are great for snuggling up in front of the tv, or over the bottom of your bed. My fiance and I both have one that we curl up in every night.
The rag quilt can be made of denim, flannel, or polar fleece. It has to be a fabric that will fray and unravel when washed. Anything with a loose weave is good, flannel is a very popular choice.
Once you have your fabric picked out you can make this quilt in as little as a weekend.
If you happen to buy to much fabric don't worry, use it to make a matching throw pillow or to do some applique on your quilt.
Your quilt does not have to have batting, if you are using denim for example you may decide not to use any at all because it will be warm enough without it. If you are making it out of denim and choose to use batting make sure it is lightweight as it will be difficult to sew through 2 layers of denim and your batting which may also be very hard on your machine. Another option instead of using the tradional batting is to use flannel. I find this is really nice when you are making the quilt out of flannel.
Cutting the pieces for your rag quilt
Choose a minimum of 3 colors for this quilt. The more color the better!
Decide on the size of squares you want to use. For your fabric which I am going to refer to as flannel because that is what I enjoy using you want your squares to be between 7"-12" in size. You will be using a 1/2" - 1" seam allowence so for each block so please keep that in mind while deciding on the size of the quilt you want. You will also want your batting (if you choose to use it) to be 2" smaller than your flannel square.
My personal choice of size is 8" for the front and back squares with a 6" batting, because that's how I roll.
Okay so you have cut your top, bottom, and batting squares. Take your bottom square and put it right side down, then take your batting and place it centered in your 8" square. You will then take the piece you want to use for your top square right side up and line them all up together as square as possible. You will then sew a line from one corner to the other and again making a X on your fabric.
You will do this for all of your squares.
Hint: Using a walking foot on your machine will help the fabric be more stable so that tucks and puckers don't occur.
Below I have done a pattern diagram of a quilt that I have made. I will use this to explain how to now piece it together. I find drawing how I want the blocks placed to be the easiest way to follow it.
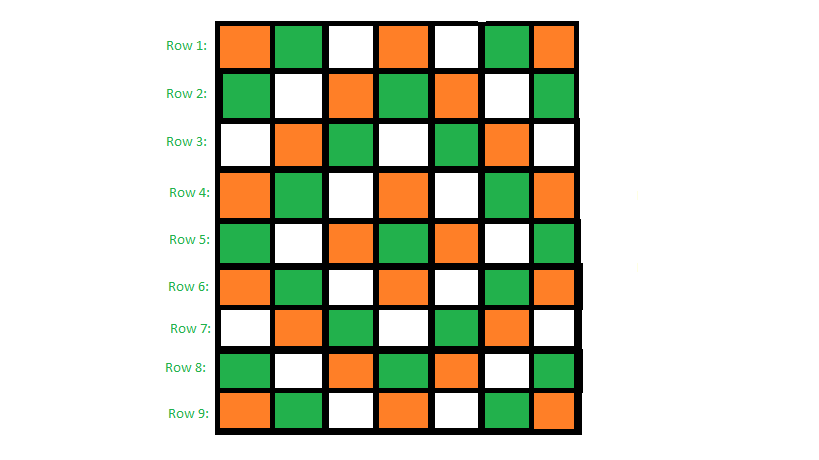
You will then attach row 1 to row 2 and etc. again make sure your raw edge is still pointing all in the same direction.
After you have attached all the rows together sew 1/2" - 1" inside the outer border all around the quilt.
Using heavy-duty or spring loaded scissors, cut lines in the seam allowances about 1/4" apart. Try to cut as close to the seam as possible without cutting it. (If you cut the seam it will fall apart in that spot when you wash it)

The scissors above are what I bought for doing rag quilts. I got them at fabric land for about $12-$15. They are great! You need ones that will cut 2-3 layers of fabric with the last 1/2"-1".
Once you have cut all the seams then throw the quilt in the washer and run it through on a normal cycle. I use cold water becasue sometimes the colors will run so this will reduce that from happening. I do not wash these in my own washer because of the amount of lint that comes off them is rediculous! It could clog up your drain in no time and that is cause for a HUGE mess. Spend the $4 and take it to the laundrymat!
Once the cycle is finished give the quilt a good shake out and pop it in the dryer. Use pretty high heat because it will help the seams fray more and become soft and fluffy. Once again I would do this at the laundrymat.
Once the quilt is dry shake it out. Lots of lint and fluff will come off. Use a lint brush to remove any excess lint and loose threads. You may also want to trim up some of the frayed edges.
If you have some stubborn threads that you just can't get off try using the vaccum cleaner to suck it off.
The more this quilt is washed and dried the fluffier and more frayed the seams become.
If you have any questions that I may answer please let me know.
Here is a look at the finished product


LOVE IT! but how much approx how much material would you need to make a quilt that size?
ReplyDeleteThis rag quilt was not very big, it turned out to be the size of approx a small lap quilt or baby size quilt. It can be hard to decide how much material you will need depending on the size quilt you want. For example I used a 1" seam on this which I then lost 4" per block. It was the second one I had done, my first being for a baby. So I only use 1/2" seam allowances now.
ReplyDeleteFor this exact quilt I bought 3M of each color of flannel and 3M of a very cheap flannel for the batting.
Each quilt will be different depending on the size you want it to be and the size squares you are using. I know when using a 8" square that I get approx 5 per strip from a 8" strip of fabric.
The easiest way to figure it out is to do a little drawing of your quilt. Use pencil crayons to color in your pattern with your choice of block colors.
Count for example how many of color 1, color 2, and color 3 you have take each of those numbers and multiply it by 2 (because you will need fabric for the front and back) you then take that number ex. 44 and X by 8 (for number of inches per block) that will give you 352" or 29.3 ft. The average Ft to every meter of fabric is 11.7 so I will need 3 meters minimum.
The same goes for your batting. If you have 63 squares on your quilt you will multiply 63 x 6 giving you 31.5 ft. So you would need to buy approx 3 ft.
Does this make sense?
Your average width of fabric on a bolt of fabric is 44" keep that in mind when purchasing it for your quilt.
If anyone needs help figuring out the fabric needed please ask.
This is so beautiful! I love the design you used! I am a follower!
ReplyDeleteCan you help me out? I am in a contest because of a recent post that I did on my weight loss. There is a contest on Face Book and I need you to vote! I am so close and I don't want the other guy to win! Just click on the link below and like that page (up at the top) then in the left hand column find my picture( I’m the one in the black bathing suit) under photo's 4 of 14 click(SEE All) and leave a comment under my picture! Thanks!!
http://www.facebook.com/#!/pages/Lehi-UT/Kristi-Approved/391083710513
You might have to copy and paste it into your browser
I would really like to try making one of these!
ReplyDeleteYou should try it Niki. It takes no time at all once you get going and it is especially great because you can leave it and just right back into it.
ReplyDeleteI was hoarding old denim jeans to make something like this but in the end had to get rid of them because i needed the space. I wanted to do a full double bed size so needed a lot of jeans.
ReplyDeleteThanks for sharing! Love the colors you chose. They are fun and I love the raggy look.
ReplyDeleteNew follower from the monday link up
Carole
www.frogbellysoup.blogspot.com